
Atmel AVR WiFi Radio WhereAVR Videoverlay EthIRnet IC-3200A Ballooning Lost At Sea Buzz-O-Matic Other Stuff APRS Tracker Generator Natural Gas Conversion Allstar Node 43710 Allstar USB FOB Local Radar 
|
EthIRnet Controller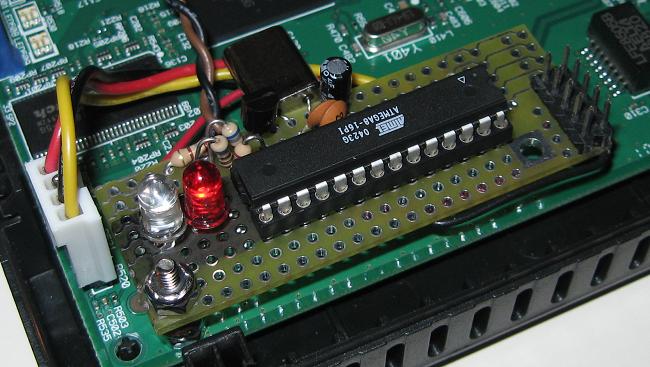
IntroductionThe EthIRnet device is an Ethernet to IR controller which accepts connections to a low-cost router and converts the contents of the packet into infrared signals which can then control TVs, Stereos, etc. Background InformationThis project came about while trying to come up with a use for some inexpensive routers I purchased a couple years ago. These routers were being sold as clearance items by Verizon, and it has garnered somewhat of a cult following of people attempting to add undocumented features. The router is a Westell 7501 and it runs special Verizon-branded firmware which cannot (or at least has not) been replaced with DD-WRT. The most cleanest "hack", so to speak, is the Lemonade project. In addition, a thread exists on dd-wrt.com which goes on for 54 pages and chronicles the efforts of many people trying to bend the router to do all sorts of neat things. That's where I began reading about it. Hardware ComponentsThe Wireless Access Point / RouterThe design is based, of course, on said Westell 7501 router. And like most routers, this one has an on-board serial port out of which streams loads of slightly interesting messages during the boot-up process. This serial port happens to run at 115,200 bps. The pictures below show the serial port holes on the board (left picture from the forum), and the right picture shows the header I soldered in. Power (3.3V) and Ground is available on this header as well on pins 1 and 3, respectively. My circuit connects to the router through this header exclusively. 

One of the most interesting things one can do with a serial port on a router is to make it available over Ethernet. Anyone who has played with 'netcat' in Linux knows what a powerful tool it is, and perhaps has used it to connect a serial port to a network port. The MicroprocessorSomething needs to connect to the serial port on the router, and for that I used a longtime favorite - the ATmega8. It's overkill since we really only need two I/O pins, but it's what I had in hand. I run mine at 14.7456Mhz, and at that speed it quite happily talks at the 115,200 bps of the router. And the microprocessor is able to blink LEDs through the use of a simple NPN transistor. The first image on this page shows the completed board mounted on a screw that runs through a hole in the case of the router and up through a hole in the router's PCB. Oddly enough, both holes were already there, so I took advantage of them. I put a spacer between the bottom of the case and the board so it wouldn't be damaged. Then another spacer went on before the microprocessor card was installed. 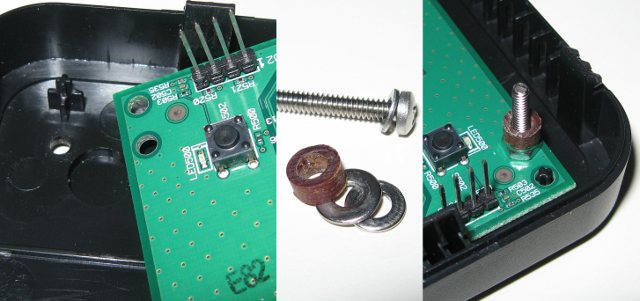
Details... of the router hackThe first challenge was to determine how accessible the serial port of the Westell router was for such an application. On the DD-WRT site above, you'll find all sorts of discussion on how to turn this wireless access point into a wireless client bridge, USB printer server, and file server. Neat stuff. But the big discovery for me was finding it had 'nc' (a.k.a. netcat) as a built-in function. This router also runs a small ssh server, and I was able to try out all sorts of things on the command line until I hit upon just the right combination. This is the code I added to the end of the "User Defined Firewall Rules" of the router: You will find the complete firewall file I used from the dd-wrt forum I mentioned above, including the above code I added, at the end of this page. So, what does it do? First, I need to point out there is no place to put a permanent file in flash on the Westell 7501. And second, you can create a file, using the Firewall Rules, in ram during boot. You can see that I created two files above. The first is created by echoing some text into a file called "index.html" in the tmp directory. The second file I create, serial.sh, takes care of passing data coming in through nc. And finally, I execute the file as a background process. NC is listening on port 1234, and any line it receives containing the text "GET" goes out /dev/ttys0 (the internal serial port.) It also returns the index.html file to the computer which originated the connection before the connection is closed. ... of the Microprocessor codeThe second challenge was to figure out how to represent the infrared signal's blink pattern in a way that could be easily sent to the microprocessor, and that the microprocessor could follow to accurately replicate the desired signal. After poking around on the web for a while looking for some ideas, I found the term "Pronto codes" kept bubbling to the top of searches. This protocol is described on the Remote Central website here. I chose to adopt the protocol since it seemed quite capable of generating any arbitrary IR signal useful in the context of controlling stereos and televisions. You will find the source code I wrote listed at the bottom of this page as well. In there you'll find I only accept codes which are wrapped between "(" and ")". This way, I can ignore any other text that may come through before or after. SchematicI haven't drawn a schematic yet as it is pretty simple. So allow me to just describe it until I get time to make one. The router's serial signal (pin 4 in the photo above) goes in pin 2 (RXD) of the ATmega8. And the ATmega8 pin 15 (OC1A) drives the base of the NPN transistor which in turn switches on the LEDs. That part of the circuit acts in much the same way as a TV-B-Gone. The 14.7456 MHz crystal and the normal loading capacitors are connected in their usual spot. And, well, that's actually all there is to describe. But I'll mention again I'm leeching my power from the 4-pin router header. Everything runs happily along with the 3.3V provided there. The following picture shows how the LEDs are arranged. I mounted one IR LED on the front of the router, and two more peek through a hole which originally held a button I'd never use. One of the LEDs is IR, and the other is visible so I can see when commands are being sent. I mounted two IR LEDs so I can direct the light towards the TV, etc. regardless of whether the router is lying flat or standing on edge on a shallow shelf (since I thought I might end up putting the router on a window sill.) 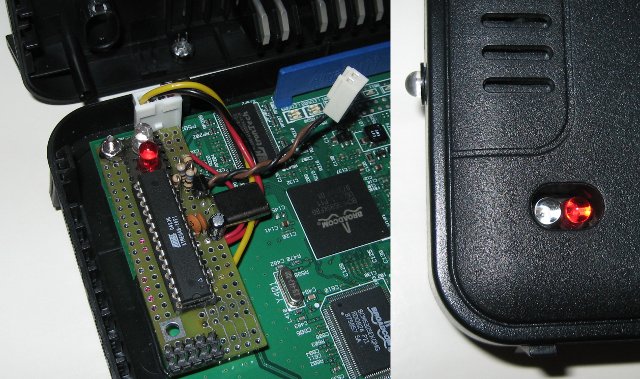
This photo shows how the socket at the end of the black/brown wires is plugged onto the leads of the front-mounted LED right before the case is closed. The socket came from an old computer harness and connected to the LED in the face of the computer in exactly the same way. Incidentally, the 10-pin header on the end of the new board is the standard ISP header for programming the ATmega8. 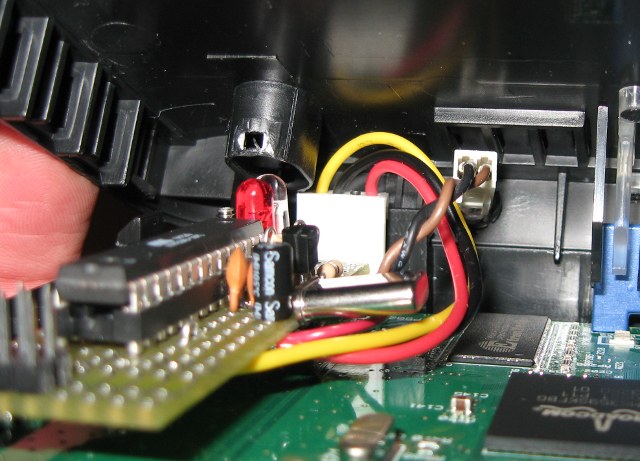
So how well does it work?Simply put, it works GREAT! I have been able to just cut-and-paste Pronto codes straight off the web into a command on my computer to send an IR code to a piece of equipment in the room where the router is located. For example, let's say my router is at 192.168.0.222. I can type this command and turn on a Sony television: Remember above when I filtered the incoming packet of data with the "GET" text? Well, that's part of an HTTP request message. And guess what? You can send an HTTP request from your browser with something like this: Now, let me explain that index.html file I created above. You may ask, what does it do in the context of a web browser? Well, nothing - by design! Actually, it contains a directive to the calling browser which says, "Hey, I don't have data to send you, so don't bother changing the page you called me from." What this does is allow us to create buttons on a web page, linking to the above URL, which sends the message we want, yet doesn't open a new page when clicked. Neat trick, eh? (Well, it would be if all browsers followed the rules, but some try to open a new [blank] page anyway. Thus one has to press the back button, which is annoying.) ConclusionI hope you enjoyed seeing my project and learned something along the way. DownloadsSetup Help: Westell_7501_Configuration_Notes.txt Firewall Rules (Final): Westell_Firewall_Rules.txt ATmega8 Source: EthIRnet_Source.zip <-added March 1, 2013 and I'll clean it up a bit more very soon. |
|---|
